 These instructions build on Vincent Morneau’s blog: Rich animations for your APEX app . The below are my recommendations (developed with Anton Nielsen for APEX Instant Tip Episode 15) for how to best integrate these “Lottie” animations into your APEX application while making minimal changes.
Task 0 – Ground work
Step 0.1 : load a javascript file to your your static application files
Create a file called loading.js (populated by the following code) and load it to your application’s Static Application Files:
function createWaitingAnimation() {
   const anim1 = lottie.loadAnimation({
   container: document.getElementById('WaitingAnimation1'),
   path: `https://assets2.lottiefiles.com/packages/lf20_lnk9yxp7.json`,
   renderer: 'svg',
   loop: true,
   autoplay: true,
   });
};


function createSuccessAnimation() {
   document.getElementById("SuccessAnimation1").innerHTML = "";
   const anim2 = lottie.loadAnimation({
       container: document.getElementById('SuccessAnimation1'),
       path: `https://assets7.lottiefiles.com/packages/lf20_w4dggajd.json`,
       renderer: 'svg',
       loop: false,
       autoplay: true,
       });
};

function createNoDataFoundAnimation(pid) {
   var ndfDiv = $('#'+pid.id).find('.a-IRR-noDataMsg');
   ndfDiv.attr("style", "height:300px");
   lottie.loadAnimation({
   container: ndfDiv[0],
   path: `https://assets10.lottiefiles.com/packages/lf20_V2yuoK.json`,
   renderer: 'svg',
   loop: true,
   autoplay: true,
   });
}

apex.jQuery(document).ready(function() {

   createWaitingAnimation();

   $('.t-IRR-region').each(function() {
       createNoDataFoundAnimation(this);
   });

   apex.message.setThemeHooks({
       beforeShow: function( pMsgType, pElement$ ){
           if ( pMsgType === apex.message.TYPE.ERROR ) {
           $('#WaitingAnimation1').hide();
           }
       }
   });
});
This script copies and pastes some code from Vincent’s blog wrapped in some functions. Notice the “createWaitingAnimation” and “createNoDataFoundAnimation” functions get invoked on page load. Also, a hook is created to interrupt the Waiting animation if a validation error is detected on the page.
Step 0.2: add 2 Javascript library references
Navigate to Edit Application Definition > User Interface > Javascript to reference the URLs for your loading.js file as well as the the Lottie js library:
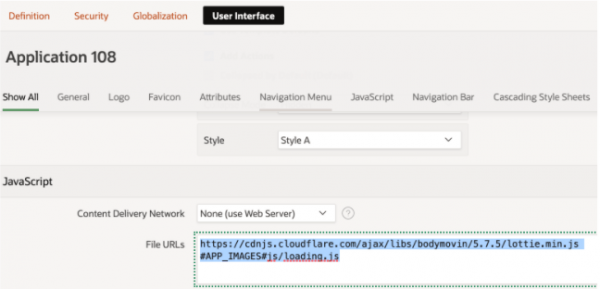
I’m using these links:
https://cdnjs.cloudflare.com/ajax/libs/bodymovin/5.7.5/lottie.min.js
#APP_IMAGES#js/loading.js
Now your entire application can reference the functionality in these resources.
Task 1: Create a “Waiting” animation on page submit (for long DB Processes)
Note: These steps assume you have completed the above “Groundwork”
Step 1.1 create a region on page 0
- Name : {WaitingAnimation}
- Static Id: WaitingAnimation1
- Template: Blank with Attributes
- Custom Attributes:
tabindex="-1" role="dialog" class="ui-dialog ui-corner-all ui-widget ui-widget-content ui-front ui-dialog--inline" style="transform: translate(-50%,-50%); position: fixed; height: auto; width: 400px; display: block; top: 50%; left: 50%;margin-right: -50%;background-color: transparent; box-shadow: none; display:none;"
Depending on your taste, purpose and chosen animation, you may wish to make different Custom Attribute choices. The above should display the loading animation in the middle of your screen against a transparent background.

Step 1.2 put it to use
Go to an application page where a button submits the page in order to complete a lengthy database process:
- Change the button’s action to be “Defined by dynamic action” and choose “Submit Page” as it’s action on click (assuming this is not already the case)
- Now, add a 2nd dynamic action to be triggered on the click event, ahead of the “Submit Page” action. This Dynamic Action will have an action of “Show” for the “WaitingAnimation” region. Alternatively, if you prefer you can have the action be to “Execute Javascript” with the following code:
$('#WaitingAnimation1').show(1500);
Task 2 : Create a “Success” Animation when a page submission successfully completes
Note: Again, these steps assume you have completed the above “Groundwork”
Step 2.1 create a region on page 0
- Name: {SuccessAnimation}
- Static Id: SuccessAnimation1
- Template : Blank with Attributes
- Custom Attributes:
style="height:250px;" - Server-side Condition: PL/SQL Expression =
apex_application.g_print_success_message is not null
Notice that the SuccessAnimation1 region only is rendered if an APEX success message is printed to the page.
Step 2.2 create dynamic action on page 0
- Server-side Condition: PL/SQL Expression = apex_application.g_print_success_message is not null
- Action : Execute Javascript
- Code :
createSuccessAnimation();
$('#SuccessAnimation1').delay(4000).hide(1000);
This dynamic action builds and auto-hides the success animation after a delay if there exists an APEX success message on the page.
Step 2.3 put it to use
It may already be working! Simply navigate to a page that gets submitted and make sure the “Success Message” of your Page Process contains a message.

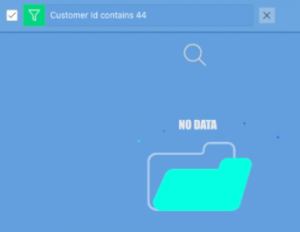
Task 3: Create a “No Data Found” Animation
Note: Once again, these steps assume you have completed the above “Groundwork”.
Step 3.1 create a dynamic action on page 0
- Event : After Refresh
- Selection Type : jQuery Selector
- jQuery Selector: .t-IRR-region
- Event Scope : Dynamic
- Action : Execute Javascript
- Code :
createNoDataFoundAnimation(this.triggeringElement)
Step 3.2 put it to use
Find / create an Interactive Report in your application to check it out!
Further reading / links
- The inspiration for this post (by Vincent Morneau) : Rich animations for your APEX app
- Browse here for more rich animations : Popular animations from our community – Lottiefiles
- I took the validation error hook from Lino Schilde’s blog post : Oracle APEX trigger JavaScript action after PLSQL validation
- On the same theme, my earlier blog on the importance of beautifying your APEX app
